So I was working with this young man with disabilities on a volunteer project he wanted to do. He wanted to provide a volunteer delivery service within a nursing home. We partnered with a local nursing home who could use a book cart the goes from room to room offering magazines and books to the residents. The only problem being that we were missing books.
I asked around soliciting donations - especially large print ones. People were
so generous. Within 2 weeks I had a hatch full of books for our book cart. I had at least 8 grocery bags full of them... Well 2 weeks into our book cart service, the young man I worked with moved with his parents and could no longer continue.
Now here I am with a hatch full of books. The nursing home took some, but I still had 4 or 5 grocery bags full of random books. So I found some fun things to do with books online and from past experiences and here are my results:
1. Meta Book Shelves
Book shelves made of books? That's my kind of shelf. Alan and I found a way to hang these without damaging the book. It's very simple. Just buy L brackets from your local hardware store (these cheap-o's were under 1$) and hang before placing the book on top.
I've seen tutorials using glue or drilling into the book, but we wanted to keep them intact. Another way to hang them a little less obnoxious is with these tiny L brackets and use the 2 on the bottom and an extra one on top to hold it in place so it doesn't fall forward (since we're not using glue or other stabilizers). The down side to this method is that the book bows a bit in the middle where the top bracket holds it in place. That drives Alan nuts since this method was his idea. But you do need the top bracket since they are so small.
 |
| Do you know how excited I was for the title of the book given the subject of the picture? Answer: Very. |
2. Book Wreath
Sorry books. There's no salvaging you in this project. 1 book was definitely harmed in the making of this wreath:
Step one: find a book worth destroying. I read a handful of pages of a couple books before settling on this one. The final choice was overly morose and had consistent grammar issues - so it was on the chopping block.
Step two- Find a good backing. It can be a page from the book, but for mine I used one of the inside lining pages because it had a neat design.
Step three- Make some cones! Find a way that works for you. I played with one until it seemed like the right width and length and then took note on where the outside corner ended up on the cone so that I could make the following cones match. Attach however you want. I used tape, hot glue guns would probably work, but I hate dealing with the strings. You'll need several of these. I needed 18 or so.
Step four- Attach your cones in a tight circle to your backing. For this I used Elmer's glue and just let it dry. Again, I'm sure hot glue gun would have worked as well.
Step five- Decorate! Now for mine I just put one flower on there. This flower is a spiral flower. Simply cut a circle of paper from a page, and then cut a thin spiral throughout that circle. Then wind up the spiral from the far side and work your way in. At the end, dab the bottom of your flower in glue and attach to wreath (or whatever you want to glue it to). You'll have to hold for a bit so the glue firms up or the spiral may come undone.
Decorate anyway you see fit. Variety is the spice of life and all that!
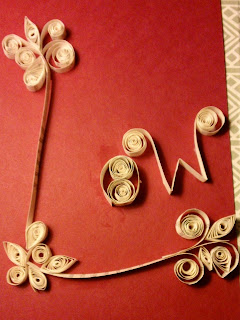
3. Quilling - Oh Quilling... I'd love to really be able to master this. But it's fun even though I have no skill with it what so ever. Here's a
good chart of starter shapes. make whatever you want with 'em! Here's my first attempt.
It say's Low-which is my fancy new last name. I know, I know, it looks like "Ow" in a fancy corner. But that's what I ended up with! Be nice!


