Labels

Showing posts with label DIY. Show all posts

Saturday, September 8, 2012

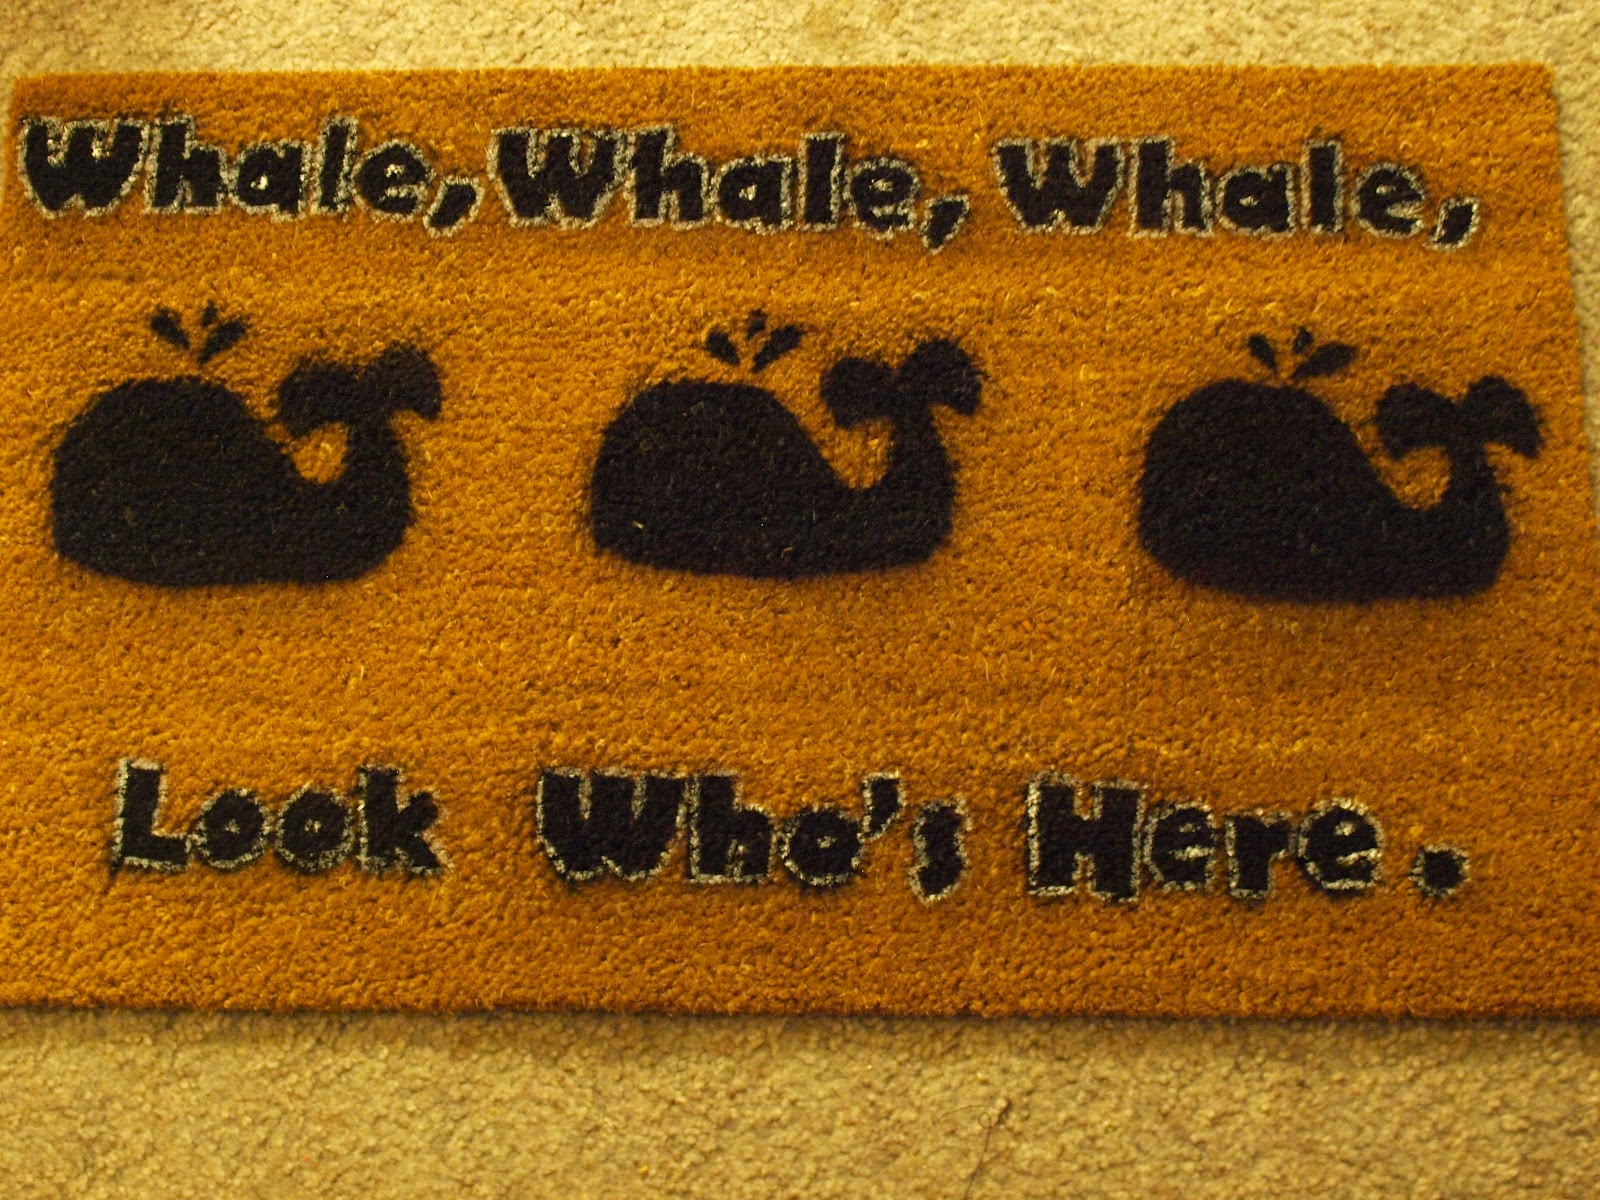
DIY Welcome Doormat

My sister bought a townhouse a few weeks ago. She's having people over for the first time and I spent some time thinking about what I would be getting her for her new place. Well - did I tell you I'm a pun connoisseur? Well I am, and it runs in the family.

So I decided to make a welcome mat with a topic pun on it. I spent some time looking up puns on the internet and here were some of my final options.

"Thank goodness you're here! It's been unBEARable without you." (bear)
"Come on in! LION down" (Lion)
"Whale, Whale, Whale - Look who's here." (3x Whales)

Well I went with the whale one. Whales are cute and kind of trendy right now. So here's the how to:

You will need:

  • Spray paint of your choice ( I chose black - matte )
  • Sheets of cardstock (or something that can be used as a stencil)
  • Blank Door Mat
  • Exacto Knife

Tape together enough card stock to completely cover your doormat.

I printed out templates for the whales and lettering because I'm no artist. Feel free to free hand! Do what you please! So stencil and cut out the design you'd like on your door mat.

Simply spray over the stencil and let dry! Super easy.


 Then I hand painted white around the details to make them more legible and obvious.


So it looked like this! Pretty simple. 

Wednesday, August 8, 2012

DIY Fun with Books

So I was working with this young man with disabilities on a volunteer project he wanted to do. He wanted to provide a volunteer delivery service within a nursing home. We partnered with a local nursing home who could use a book cart the goes from room to room offering magazines and books to the residents. The only problem being that we were missing books.

I asked around soliciting donations - especially large print ones. People were so generous. Within 2 weeks I had a hatch full of books for our book cart. I had at least 8 grocery bags full of them... Well 2 weeks into our book cart service, the young man I worked with moved with his parents and could no longer continue.

Now here I am with a hatch full of books. The nursing home took some, but I still had 4 or 5 grocery bags full of random books. So I found some fun things to do with books online and from past experiences and here are my results:

1. Meta Book Shelves


Book shelves made of books? That's my kind of shelf. Alan and I found a way to hang these without damaging the book. It's very simple. Just buy L brackets from your local hardware store (these cheap-o's were under 1$) and hang before placing the book on top.


I've seen tutorials using glue or drilling into the book, but we wanted to keep them intact. Another way to hang them a little less obnoxious is with these tiny L brackets and use the 2 on the bottom and an extra one on top to hold it in place so it doesn't fall forward (since we're not using glue or other stabilizers). The down side to this method is that the book bows a bit in the middle where the top bracket holds it in place. That drives Alan nuts since this method was his idea. But you do need the top bracket since they are so small.

Do you know how excited I was for the title of the book given the subject of the picture? Answer: Very. 
2. Book Wreath

Sorry books. There's no salvaging you in this project. 1 book was definitely harmed in the making of this wreath:

Step one: find a book worth destroying. I read a handful of pages of a couple books before settling on this one. The final choice was overly morose and had consistent grammar issues - so it was on the chopping block.

Step two- Find a good backing. It can be a page from the book, but for mine I used one of the inside lining pages because it had a neat design.

Step three- Make some cones! Find a way that works for you. I played with one until it seemed like the right width and length and then took note on where the outside corner ended up on the cone so that I could make the following cones match. Attach however you want. I used tape, hot glue guns would probably work, but I hate dealing with the strings. You'll need several of these. I needed 18 or so.


Step four- Attach your cones in a tight circle to your backing. For this I used Elmer's glue and just let it dry. Again, I'm sure hot glue gun would have worked as well.

Step five- Decorate! Now for mine I just put one flower on there. This flower is a spiral flower. Simply cut a circle of paper from a page, and then cut a thin spiral throughout that circle. Then wind up the spiral from the far side and work your way in. At the end, dab the bottom of your flower in glue and attach to wreath (or whatever you want to glue it to). You'll have to hold for a bit so the glue firms up or the spiral may come undone.

Decorate anyway you see fit. Variety is the spice of life and all that!

3. Quilling - Oh Quilling... I'd love to really be able to master this. But it's fun even though I have no skill with it what so ever. Here's a good chart of starter shapes. make whatever you want with 'em! Here's my first attempt.

It say's Low-which is my fancy new last name. I know, I know, it looks like "Ow" in a fancy corner. But that's what I ended up with! Be nice!
Sunday, August 5, 2012

Snowman Cupacke Decoration Tutorial


I made these for Alan's brother's Christmas in July party. They were super easy to make, although a tad time consuming.


I know, it looks like it's impending doom is coming in the form of a knife...but we ate him instead. 


So here's the deal: I am a terrible cake decorator. I have an Aunt who can make cakes look too good too eat. I do not have this gene. I've tried. I think you need a steady hand and an artistic eye - of which I have neither.

So I've come to terms that I'm better at decorating with prefixed items. I've made that kit kat-m&m cake. I've decorated with hershey bars and graham cracker dust for S'more's cupcakes. I need things that are already composed and just need placement.

These cupcakes require:

  • White Icing
  • Granulated Sugar
  • Chocolate Wafers
  • Chocolate Chips
  • Mini Chocolate Chips
  • Orange Slices (My favorite!)
First ice any cupcake with the white icing. Pour sugar in a shallow dish and immediately dip the top lightly into sugar to get a crystallized look. 

Place 2 chocolate chips for eyes and 6-8 for the mouth or smile. Cut up orange slices to make smaller triangles and use this for the nose.

The hardest part is the hat. For this we used a serrated knife to cut the wafers in four sections like this:

Use the wide parts as the top hat, and narrow strips for the brim. The top hat is my favorite part.


Saturday, August 4, 2012

Special Agent Lazer Grid

This game was named by my friend's six year old nephew: Harrison. I got the idea from watching the guys on the show "Big Bang Theory" play a lazer grid mission impossible game. Obviously, I do not have access to lazers...but I do have access to string.

I decided it would be fun to tape lengths of string across the narrow hall of our apartment to make a simulated lazer grid obstacle course. Using different heights, lengths and angles could increase the difficulty of the lazer security grid.

Each child (in our case, the one child and 2 clumsy but childish adults) goes through the "security grid" without knocking over any strings. Knocking a string off the wall meant you had been found out and thus, caught red handed!

It was a lot of fun. Harrison went through twice and was only detected by one lazer. Alan and I both completely demolished a string each, but we still made it through relatively unscathed. Then we let a 2 year old try it. He had some great technique, systematically ripping every string off the wall and just walking straight though the hall way...well played...and poor Harrison still wanted to play and spent some time playing "Imaginary Pretend Special Agent Lazer Grid" which is really just acrobatics in a hallway.


Thursday, July 26, 2012

Chalkboard Paint Magic

I'm not going to lie; I went a bit chalkboard paint crazy for my wedding. But there are so many possibilities and for so much more than weddings. Chalkboard paint (and now magnetic paint) have made so many new possibilities for this DIY crafting type of activity. Here are my main 2 chalkboard paint projects:

1. Chalkboard Program:

Alan did most of the work for this.
We bought a sheet of compressed word and painted it first with primer and then with the chalkboard paint.
We also bought some molding to frame it out and painted it white.
We attached them with wood glue and clamped them over night.
Then you can just buy chalkboard markers (my roommate uses the same ones at Starbucks where she works) and have someone with nice penmanship write out your information (I used my roommate.)
Simple. Although we did the bulk of our painting in the basement of our apartment complex

. This initiated a loud and heated argument with my first floor neighbor. No worries though, she was always the worst. But the warning here is, keep the project in a well ventilated area.


2. Table Numbers:

Funny story. I made a couple blunders during my wedding planning stage. For one, I forgot to add my husband and me to our head count for our caterers...but another one was all of the sudden it was 3 days before my wedding, and I have no way of telling one table from the other. I had made all the guest cards and the seating arrangement without ever thinking "how are they going to know which table is table 10?" So, I had some extra chalkboard paint and I made these:

I got married on October 14, 2011. So if there was anything that was extremely available at the time, it was pumpkins. So Alan and went and bought 15 of them and this time, because of the aforementioned neighbor argument, brought them to my parents house.


I placed them on top of trash bags to protect the driveway and painted them directly. It might have been better to use a primer, but it worked out fine. They needed 2 full coats but I could only do half at a time, so it took 4 rounds of spraying. 

I loved this last minute table number, and it would have been relatively stress-free had it not been 3 days before the wedding. 

Tuesday, July 24, 2012

"Shot of Wheat Grass" Favor

Did you know that I am a pun connoisseur? Well, I am. So our wedding favor was one these guys:

Rubber ducky and Lenox angel love the grass.

It's a "Shot of wheat grass". Wheat grass is a popular nutrition supplement. Usually it's juiced, and then taken in a shot form to enhance digestion and immune systems; so at some very earthy cafe's you can actually order a shot of wheat grass juice.

I am not this healthy (you can tell in my pictures and recipes!). I simply love grass. I love laying in grass, the look of it, the smell of it. Grass was in my centerpieces, in my decorations, even on my wedding cake, although it was made of icing.

So I wanted to have a shotglass with a tuft of grass sticking out to be our favor. I wanted it to be like a play off of centerpieces like this:


But ever the re-purposer, I wanted the grass to be useful to my guests. So I looked up functional grass, and decided between Lemon Grass (can be used in cooking) and wheat grass. I went with wheat grass mostly for aesthetics. But when I realized that it would be a literal shot of wheat grass...the pun was the clincher.

So here's the deal with wheat grass. It needs to be timed very well. And wheat grass can be a bit high maintenance. So we bought a wheat grass growing kit online. It came with the soil, the seeds, fertilizer and growing trays, which was great. We bought shot glasses (with love written in binary code) from Discountmugs.com  (Very reasonable)

We set up a table lined with shot glasses (not in a fun way) and filled each with soil and fertilizer (yes, all 175 of them). We covered the top of the soil with wheat grass seeds closely together (not all sprout, and they're meant to be tightly packed).

We sprayed each with water and then topped with a layer of paper towels. Then we sprayed the paper towels to keep them moist for the seeds. Twice a day we sprayed the towels to keep moisture on the grass and sure enough, after 5-6 days they sprout enough to push those towels off.


I've heard that mold can grow while in the paper towel phase, and I've also heard you can spray with a bit of vodka to get rid of it, but it wasn't needed for my batch. You only need 8-9 days to get to the first picture. We let our sprout a little too long, so learn from our mistake! We were also able to use our favors for other purposes!


Baby Jar Chandeliers

Full Disclosure: This was my hands-down favorite DIY Project I did for our wedding; however, it was also the most difficult and time consuming (as well as injurious!). So difficult, in fact, that I told our photographer to try and get them in the most pictures so I could justify the time I spent making them. Here is the picture of our finished result:

I'm showing you it finished first to try and incentivize you to try it. I still would have done it over again if given the option, it was just tedious and I'm particular, which didn't help.

Step 1: Calling all baby food jars! I put out (on facebook) a request that all my lucky new-parent friends and family save glass baby food jars. In hind-sight, I probably would have included the word clean in my baby food jar post. :)

Step 2: Clean baby food jars. Yes, I did get some that weren't so much as rinsed out, but you'll be happy to know that you can recycle the lids and the jars can run through the dishwasher.

Step 3. De-Glue where the label was. I tried many methods and this is what worked: 1. Boil water and 1tsp vinegar with jars. 2. Rub rubbing alcohol on what residue is left. and 3 (because I'm particular) use a razor to chip of what's remaining. Please please be careful.

Step 4. You will need to buy:


  • Small ball link chain (you can buy them by the spool in bulk online)& connectors
  • Silver color wire
  • Circular cooling rack (you can buy them from kitchen supply stores online)
  • Wire-cutters (if you don't already have them)
  • Small s Hooks
Step 5. Determine how long you want your candles to hang. For me, I wanted them to be at varying lengths between 1.0-2.0 feet away from the cooling rack. So I cut lengths of chain in pairs between 2-4 feet long. Then I would take 2 chains the same length and attach them to the baby jars by wrapping wire around the jar+chain about 4 times. Using the wire cutters, I would twist the ends of the wires together to keep it extra tight and tuck in the sharp ends (this is where the injuries came from, so be careful!)

Step 6. Loop the chain and use the connector to close the loop to the opposite end of the chain so it's like a jar necklace. Do the same with the other chain on that jar. Then put an S hook on your cooling rack and hang the jar on the opposite side of the "s" hook. Attach as many jars as you wish! For me it was 8-10. You're going to want to spread them out evenly or it will be hard to have the entire chandelier sit level.

Step 7. Like I said previously, I'm particular, so I had to re-situate every jar multiple times...but when I was finally done, I filled it with black rock from an aquarium store (cheaper) but you can find other options or another inexpensive items might be sand or soil so long as it's not flammable. (Now that I think about it - it would be cool to grow herbs from there...). Drop in the tealight, light-up and enjoy!

I used a plant hanger (shepard's hook) to hang them at the ceremony. Or atleast I attempted to. It rained on my wedding day, so they put them in some pots that had plants in there... it was haphazard at best, but I still loved these little trouble some chandeliers. 

Monday, July 2, 2012

DIY Direction Sign

Another inexpensive project we took on (and by we, I mean Alan, cause I have to give credit where credit's due, and Alan did all of this project) is a sign to let our guests know where to turn to get to the wedding site. We literally just got the most cheap piece of spare wood from our local hardware/lumber store. Alan went to town on it with a hammer to bang up the edges a bit. We painted it a barn door red type of color and then Alan chipped away with a screwdriver and hammer. 


The great thing about projects like this is that it's not meant to look perfect. It's supposed to look rustic. I bet the finished result would have looked even better if we had done that technique where you paint over dried Elmer's glue to get that weathered paint look. Alan also drilled holes and hung the sign with some twine we had around the apartment. Here's the finished result from our big day!

Sunday, July 1, 2012

DIY Luminaries

This little blog being a new endeavor, I just wanted to show some of the money saving projects my husband and I did for our wedding this past October. I'll start with what I believe was Alan's favorite: These Tealight Luminaries (originally from candletech.com). All you basically need is any candles (we got "Emergency Candles" at the dollar tree) and some balloons. Also, a double boiler would of helped, but being as we do not have one of those, we grabbed a coffee tin, put it on top of some cookies cutters to elevate it in the pot of boiling water below. I would not recommend it, but it did work.

Pull the wicks out of the candles if possible, and place in double boiler to melt. Once melted, fill balloons with enough water to make it more of a sphere than an oval. Or whatever you want it to look like, that's just what we did. Once filled, dip it into the wax, pull it out, wait 10-30 seconds and then dip it again. Repeat this until you get the desired thickness. For us it was about 5 times a luminary. I don't think you have to worry about hitting the sides. We were always nervous but the balloons never popped. 


Feel free to ridicule our wallpaper! I hate it too. But we're renters, so we'll take what we can get. After a while you'll get a bunch of wax covered balloons like this:


Once they've fully cooled, poke a hole in the top of the balloon, and let the water slowly drain out (or pop vigorously and deal with the mess that ensues, like we did.) Once empty, we did re-melt the edges to make a straight line by running it along a hot surface (a frying pan covered in foil worked for us). And this is our finished product!


Please make sure you use the the battery operated tealights! Real ones will melt the luminary, it is made of wax!  More extraordinarily late wedding posts to follow!