Sunday, August 19, 2012

Rutabaga Fries

We're bringing Rutabaga back.


Let me tell you why. You know how you call your loved ones names that out of context sound completely absurd? For intsance, I call my dog "Pigeon" alot. Not sure where it came from. His name is Cody - so it makes zero sense. Husband, Alan doesn't get it. And that's fine for me - but one night, when we were saying goodnight I said something like "Goodnight, Pumpkin" and without batting an eye he returns "Alright goodnight Rutabaga"

I know it's not as funny now but I literally laughed so hard I cried. It was so random and obviously he meant it to be. He thinks all nicknames are random. But it was so absurd I couldn't help but love it. Rutabaga. I never even tried one of those - I certainly couldn't pick it out of a fruit and veggie line up, and neither could Alan.

Well for a while Alan regularly called me rutabaga. It's my favorite nickname I've ever had because it's just so ridiculous. After a few weeks of it though, we realized, neither of us have ever had Rutabaga, or new what it was. So we tried it - with much apprehension. Alan cut it up into smaller cubes, cooked them through and then mashed them like potatoes.

It was awesome. A really good replacement for potatoes since they're slightly healthier. Well now we're hooked. We got 3 more rutabaga waiting to be experimented on: But here are some Rutabaga fries!

What you'll need:
1 Rutabaga
2 TBS of olive oil
1 tbs on cornstarch
1tsp of parsley
1tsp of garlic powder
1 tsp of onion powder
(this is one of those flexible dishes, you can use any spice profile you want)

1.  Rinse rutabaga and use a vegetable peeler to remove waxy skin. It's much easier than I suspected it would be.

2. Rinse rutabaga again and cut it into quarters, then continue to cut the sections into smaller strips, whatever size you'd like the fries to be.

3. Put strips into a bowl and coat with olive oil then coat with cornstarch and your other spices. The cornstarch helps to stiffen fries, since we're baking them.


4. Bake fries for 15 minutes at 425 degrees. Stir about half way through cooking time to fully crisp both sides. Enjoy!


Wednesday, August 8, 2012

DIY Fun with Books

So I was working with this young man with disabilities on a volunteer project he wanted to do. He wanted to provide a volunteer delivery service within a nursing home. We partnered with a local nursing home who could use a book cart the goes from room to room offering magazines and books to the residents. The only problem being that we were missing books.

I asked around soliciting donations - especially large print ones. People were so generous. Within 2 weeks I had a hatch full of books for our book cart. I had at least 8 grocery bags full of them... Well 2 weeks into our book cart service, the young man I worked with moved with his parents and could no longer continue.

Now here I am with a hatch full of books. The nursing home took some, but I still had 4 or 5 grocery bags full of random books. So I found some fun things to do with books online and from past experiences and here are my results:

1. Meta Book Shelves


Book shelves made of books? That's my kind of shelf. Alan and I found a way to hang these without damaging the book. It's very simple. Just buy L brackets from your local hardware store (these cheap-o's were under 1$) and hang before placing the book on top.


I've seen tutorials using glue or drilling into the book, but we wanted to keep them intact. Another way to hang them a little less obnoxious is with these tiny L brackets and use the 2 on the bottom and an extra one on top to hold it in place so it doesn't fall forward (since we're not using glue or other stabilizers). The down side to this method is that the book bows a bit in the middle where the top bracket holds it in place. That drives Alan nuts since this method was his idea. But you do need the top bracket since they are so small.

Do you know how excited I was for the title of the book given the subject of the picture? Answer: Very. 
2. Book Wreath

Sorry books. There's no salvaging you in this project. 1 book was definitely harmed in the making of this wreath:

Step one: find a book worth destroying. I read a handful of pages of a couple books before settling on this one. The final choice was overly morose and had consistent grammar issues - so it was on the chopping block.

Step two- Find a good backing. It can be a page from the book, but for mine I used one of the inside lining pages because it had a neat design.

Step three- Make some cones! Find a way that works for you. I played with one until it seemed like the right width and length and then took note on where the outside corner ended up on the cone so that I could make the following cones match. Attach however you want. I used tape, hot glue guns would probably work, but I hate dealing with the strings. You'll need several of these. I needed 18 or so.


Step four- Attach your cones in a tight circle to your backing. For this I used Elmer's glue and just let it dry. Again, I'm sure hot glue gun would have worked as well.

Step five- Decorate! Now for mine I just put one flower on there. This flower is a spiral flower. Simply cut a circle of paper from a page, and then cut a thin spiral throughout that circle. Then wind up the spiral from the far side and work your way in. At the end, dab the bottom of your flower in glue and attach to wreath (or whatever you want to glue it to). You'll have to hold for a bit so the glue firms up or the spiral may come undone.

Decorate anyway you see fit. Variety is the spice of life and all that!

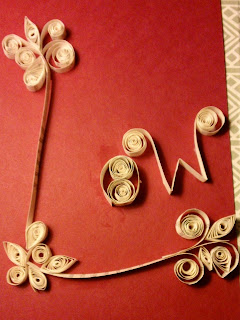
3. Quilling - Oh Quilling... I'd love to really be able to master this. But it's fun even though I have no skill with it what so ever. Here's a good chart of starter shapes. make whatever you want with 'em! Here's my first attempt.

It say's Low-which is my fancy new last name. I know, I know, it looks like "Ow" in a fancy corner. But that's what I ended up with! Be nice!

Sunday, August 5, 2012

Snowman Cupacke Decoration Tutorial


I made these for Alan's brother's Christmas in July party. They were super easy to make, although a tad time consuming.


I know, it looks like it's impending doom is coming in the form of a knife...but we ate him instead. 


So here's the deal: I am a terrible cake decorator. I have an Aunt who can make cakes look too good too eat. I do not have this gene. I've tried. I think you need a steady hand and an artistic eye - of which I have neither.

So I've come to terms that I'm better at decorating with prefixed items. I've made that kit kat-m&m cake. I've decorated with hershey bars and graham cracker dust for S'more's cupcakes. I need things that are already composed and just need placement.

These cupcakes require:

  • White Icing
  • Granulated Sugar
  • Chocolate Wafers
  • Chocolate Chips
  • Mini Chocolate Chips
  • Orange Slices (My favorite!)
First ice any cupcake with the white icing. Pour sugar in a shallow dish and immediately dip the top lightly into sugar to get a crystallized look. 

Place 2 chocolate chips for eyes and 6-8 for the mouth or smile. Cut up orange slices to make smaller triangles and use this for the nose.

The hardest part is the hat. For this we used a serrated knife to cut the wafers in four sections like this:

Use the wide parts as the top hat, and narrow strips for the brim. The top hat is my favorite part.


Saturday, August 4, 2012

Special Agent Lazer Grid

This game was named by my friend's six year old nephew: Harrison. I got the idea from watching the guys on the show "Big Bang Theory" play a lazer grid mission impossible game. Obviously, I do not have access to lazers...but I do have access to string.

I decided it would be fun to tape lengths of string across the narrow hall of our apartment to make a simulated lazer grid obstacle course. Using different heights, lengths and angles could increase the difficulty of the lazer security grid.

Each child (in our case, the one child and 2 clumsy but childish adults) goes through the "security grid" without knocking over any strings. Knocking a string off the wall meant you had been found out and thus, caught red handed!

It was a lot of fun. Harrison went through twice and was only detected by one lazer. Alan and I both completely demolished a string each, but we still made it through relatively unscathed. Then we let a 2 year old try it. He had some great technique, systematically ripping every string off the wall and just walking straight though the hall way...well played...and poor Harrison still wanted to play and spent some time playing "Imaginary Pretend Special Agent Lazer Grid" which is really just acrobatics in a hallway.